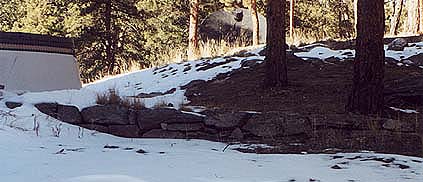
| As you drive through the Rocky Mountains, you can't help but notice the geology. Rocks are everywhere. Cliffs, knobs, and road cuts reveal layer upon layer of rocks. Our property is located at the northern section of the Pikes Peak batholith, an up welling of pink granite through metamorphic rocks of gneiss and schist.
We have rocks of all sizes from the 2-5 inch rocks that I call rubble to massive rock outcroppings. As I worked my vegetable garden area, I removed the rocks (mostly rubble size) from the garden soil. However, it seemed each year a new crop of rocks was appearing. I had a theory that the rocks were growing in my garden better then my plants (of course, it only seemed this way). In a few years, I had a rock pile about 3 feet high and 5 feet across. So what to do with all these rocks piling up? My solution is to use these and other rocks in landscape features such as: erosion control, a rock walk, and a rock wall . Working with rocks is not as easy as one might think. In Lessons Learned, I share some of my experiences working with rocks. My flower gardening activities are also rock usage intensive. Click here for my flower gardening page. |
||
|
We have decomposed granite instead of soil. Basically, decomposed granite is pink Pikes Peak granite that has eroded into small, irregular shaped particles about 1/4 inch in diameter. Decomposed granite washes much like sand and, in El Niño years when when we may have a major rain storm of 3 inches or more, our driveway will wash.
|
||||
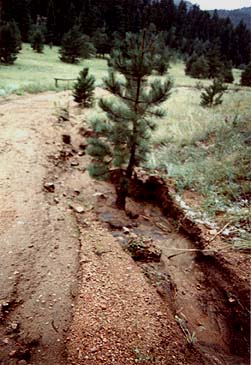
This is a view of a ditch along a portion of our driveway, showing erosion damage in 1989. |

This photograph shows erosion damage to the same ditch that occurred in a 1997 rain storm. |
|||
|
First, we put rubble in the ditch but, on the rare occasions when we had a major rainstorm, the water flowed so fast and forcefully that the rubble washed out of the ditch Rocks as big as 8 inches across would wash as the above photograph taken in 1997 shows. We, therefore, went around our property and, using our tractor, moved much larger rocks to line the side of the ditch. |
||||

Here is the same ditch in 2001 showing the large rocks lining the wall next to the driveway. |
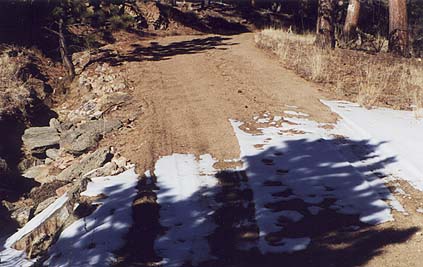
This photograph also shows the ditch in 2001. Notice how the driveway has been graded to slope toward the ditch. We did this so water drains towards the ditch and not down the grade of the driveway. |
|||
|
||||
| back to top | ||||
|
Although our decomposed granite is much like sand and is rarely muddy, I put a rock wall around our hot tub for two reasons: to keep debris from getting into the hot tub and to give us a place to drain off after getting out of the hot tub.
|
||
 |
This 1991 picture shows my initial attempt at a walk. I used some 8 x 16 inch pavers we happen to have around and some larger flat rocks. The pink flowers are fire weed which have since died out. | |
|
This initial walk had some problems. It wasn't pretty. Grass and flowers still got into the hot tub. The biggest problem, however, was critters. First, a chipmunk (and then her descendants) moved in under the tub. Next, a rabbit thought the hot tub would make a fine cover for her home. I felt that the burrowing was undermining the hot tub base and needed to convince the critters that this was not a good place for a home. As I roamed our property, I noticed many flat rocks ranging from 8 inches to 30 inches in diameter. Over the years, I collected these flat rocks and in 1999, rebuilt the rock walk.
|
||
| This 2000 picture taken from the balcony above the hot tub shows the rock walk. The rocks are placed right next to the tub wall and prevent burrowing animals from getting under the tub. In the lower right corner, the existing board walk from our back door just shows. |
 |
|
|
The rock walk has two additional features. In the winter, snow is easier to remove from around the hot tub. Also, the sun heats the rocks and melts the snow quicker then the surrounding grass and dirt areas. |
||
| back to top | ||
|
I decided to change (once again...) the rock wall in April, 2002. First I removed the original rock wall, setting the rocks aside for use in the new version. I decided where I wanted the rock wall to meet with the existing deck and where I wanted the rock wall to terminate. Then, I planned the curve in the wall. |
||

|
This photograph shows the rock wall in progress. I placed a wide, heavy rock next to the deck to use as a step. Then I created the rock wall much as I would build a puzzle. As I balanced each rock, I put rubble and dirt behind the rock to keep it in place. I was filling in behind the wall with rubble when I took this photograph.
If you look closely, you can see where I extended the hot tub drain through the new wall. I also stood the rocks on end rather then laying them flat as in the prior wall. This looked better to me and used less rocks but was more difficult to build. |
|

|
Here is how the rock wall looked during the autumn. I placed rubble and decomposed granite behind the rocks and then filled in the rest of the area with dirt from my vegetable garden. Right behind the rocks, I put in a 6 inch band of precious compost.
I planted grass in the larger area. In the compost, I planted gypsophila repens, a prostrate baby's breath. This grew fairly well until the local rabbit tried it out for lunch and decided it was quite tasty, thank you. |
|
| Now that I have a rock wall that I am satisfied with (finally), I can continue work on the terrace below the wall in 2003. | ||
| back to top | ||
|
While working with rocks, I learned the following:
|