When I started researching on how to construct a rock garden, I read that 2/3 of each rock should be buried so the garden has a natural look. Here's some places on the internet that give this advice:
English Garden Tips
How to Design A Rock Garden
Sunset - Rock gardening
After moving a large rock to my garden site, I couldn't understand why I should bury most of the rock where no one could see it.
I looked around at local natural landscapes and noticed that most rocks in slopes were not buried to 2/3 of their volume. On the contrary, the top and front face of each rock was usually exposed with dirt from the hillside accumulating at the top of the rock and along the sides. The amount of rock buried was usually proportional to the slope of the land. Rocks on steeper land were buried less and rocks on flatter land were buried more.
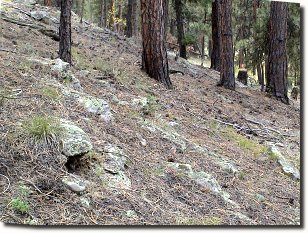
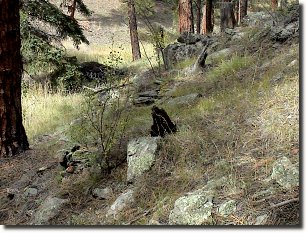
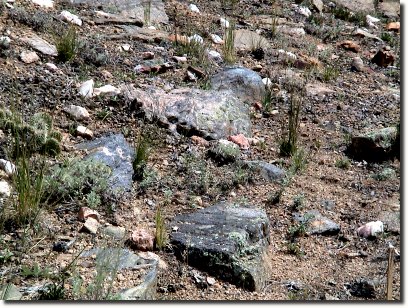
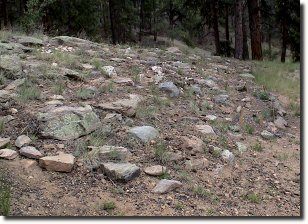
The above images, taken on two natural, steep areas of our property, illustrate this point. Notice how both large and small rocks are set into the slope so the top face is almost level or sloping downhill and how each rock forms a step-like formation in the slope with soil mounded uphill from the rock.
Notice also, a rock near the forefront in the first image has a hollow under the downhill slope. I noticed this is a fairly common phenomenon with larger rocks. The soil erodes from underneath the rock forming a hollow where ferns thrive or small animals burrow and create a home.
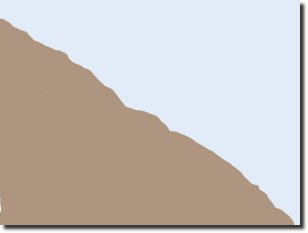

These two simple diagrams illustrate what I observed. The first diagram is the initial slope. The second diagram has rocks places into the slope. Each rock has the top and front face exposed. The slope now has a step-like configuration.
Using my observations, this is how I constructed and placed rocks in each section of my rock gardens:
I gathered rocks for the part of the garden I was going to work on next. My agreement with my husband is that I would only use rocks moved when our house was build or the driveway constructed. I would not use rocks in their natural setting that had never been disturbed. This still left many rocks for me to use.
As I gathered the rocks, I placed then in approximate locations to see how the rocks looked and balanced each other. As I placed each rock, I decided what would be the top face and what would be the front face. I moved the rocks around a lot until I liked how the garden section looked.
I used the "squarer" or "rounder" rocks for the steeper slopes and flatter rocks for the rest of the garden. This way, I could have the largest possible front face of a rock show and create a deeper step effect in the steep slope areas.
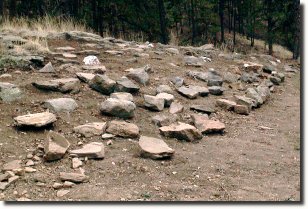
The following image shows rocks placed in my big rock garden, ready to be dug into the slope. I had to use a lot of imagination to picture in my mind how the buried rocks would look. The final image of my big rock garden at the end of this tip is almost the same camera angle of this area with the rocks dug into the slope.
When I had enough rocks to create the garden section and I was satisfied with their placement, I began to dig in the rocks, starting at the bottom of the slope and working upward.
Using a shovel and a mattock, I chiselled out a hole for the rock. As I dug, I placed the excess dirt above the hole, separating the dirt and small rocks into separate piles. Since the bedrock is just below the surface of my rock gardens and I have to really work hard to break up this rock, I often think of my high altitude gardening as akin to mining.
I then placed the rock into it's hole and, using small rocks, positioned the rock to the hight and angle that I wanted. This was not always easy and I often had to take the rock out of the hole, dig/chisel a bit more, and then put the rock back into the hole.
Once I had the rock positioned as I had envisioned it, I put the small rocks in the hole around the rock and, put a small amount of compost uphill from the rock. Then I pushed the dirt from the hole behind and around the rock, making sure the dirt behind the rock was fairly flat.
I usually put plants just uphill from a rock. This way, the plant gets a bit of compost at its roots and, since water flows downhill even underground, the plant get more moisture as the rock traps some of this downhill flowing water.

The first image shows rocks I placed in the steep slope next to our lower driveway. I placed each rock so the top face was almost level and the front face was perpendicular to the slope. I have not planted this garden yet; the grasses and plants are all ones that appeared naturally.
The second image from the middle of my big rock garden also illustrates the same rock placement principles. This image shows how I disregarded other advice on constructing a rock garden. Many sources state that the largest rocks should be placed at the bottom of the slope with gradually smaller rocks being placed up the slope. Again, if you look at the two natural landscape images, you can see that this is not true in our settings. The rock sizes are randomly strewn on the slope.
This image shows another view of my big rock garden. The slope of this garden varies from east to west, with the steepest slope in the west (the foreground of this image). Most of these rocks were been in place for 4 years when this image was taken and natural erosion of loose soil have contributed to burying the rocks into the slope and creating the step-aspect above each rock.
I was in progress of collecting more rocks for the west end of this rock garden. These rocks are in the image foreground. They look unnatural and, without being buried at all, are obviously man-placed. You can easily see the difference between these rocks and the finished portion of the garden. While rocks do not need to be buried to 2/3 of their volume, they do need to be dug into the ground somewhat.